JavaScript Implementation! Confirmation Dialog for Form Submission: A Simple Guide to the Confirm Method
In web development, obtaining user confirmation before submitting form data is very important.
This article explains in an easy-to-understand way how to use JavaScript’s confirm method to prompt the user with the choice of “Submit” or “Do not submit” before sending the form.
Styling the Form with CSS
First, let’s look at the CSS to apply styles to the form and its elements.
Here, we set the design for the text box (.txt1) and the submit button (.btn1). These styles help improve the form’s appearance.
<style>
* {
  padding: 0;
  margin: 0;
}
body {
  font-size: 18px;
  text-align: center;
}
h1{
  text-align: center;
  font-size: 24px;
  padding: 20px 0 40px 0;
}
.txt1{
  width: 450px;
  padding: 8px;
}
.btn1{
  padding: 6px;
}
</style>
This CSS centers the form elements and sets appropriate padding and margins, creating a visually appealing form.
Building the Form with HTML
Next, let’s explain the HTML structure of the form.
Here, we specify an arbitrary name for the form tag (e.g., name="dadform") and a method (GET or POST).
If you choose GET, the input contents of the form will be sent as URL parameters. Inside the form, we place a text box (name="txt1") and a submit button (name="btn").
<h1>Before sending the form contents, use JavaScript confirm to check via dialog whether to “Submit” or “Not Submit.”</h1>

<form name="dadform" method="GET">
    <input class="txt1" type="text" name="txt1" value="Clicking the "Submit" button on the right will take you to the dad-union.com site.">
    <input class="btn1" name="btn" type="submit" value="Submit">
</form>
This HTML code lays the foundation for giving users the chance to confirm before submitting the form.
Implementing the Confirmation Dialog with JavaScript
This is the important part.
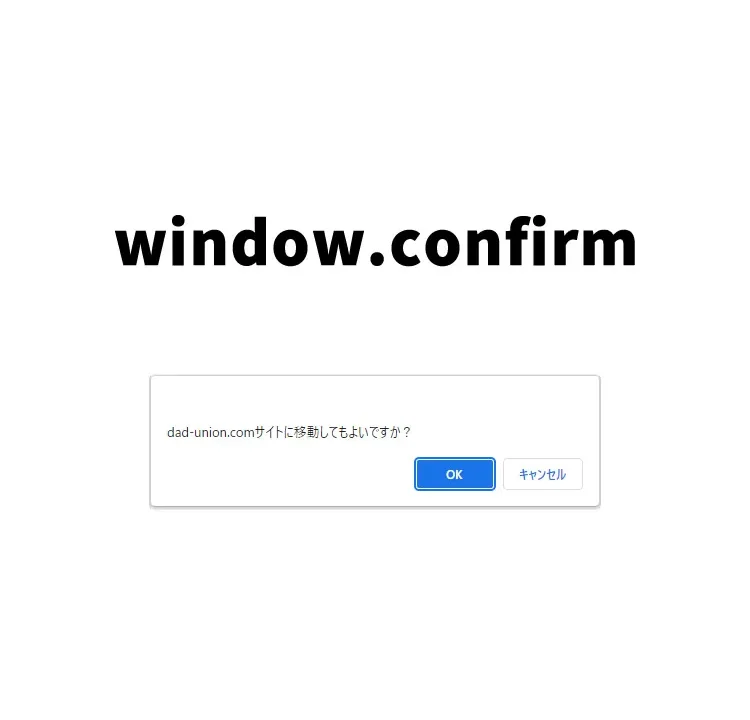
When the button (name="btn") inside the form tag (name="dadform") is clicked, window.confirm() displays a confirmation message before the form is submitted.
If the user clicks “OK,” the form’s action is set to “https://dad-union.com” and the data is sent there. If the user chooses “Cancel,” nothing happens.
<script>
document.dadform.btn.addEventListener('click', function() {
    var okng = window.confirm('Is it okay to move to the dad-union.com site?');
    if(okng) {
        // If true
        document.dadform.action = "https://dad-union.com";
    }else{
        // If false
    }
})
</script>
This JavaScript code is the key to making the form submission process more user-friendly.
Demo Page: Confirming “Submit” or “Do Not Submit” with JavaScript Confirm
If you’d like to try this feature in action, please check the demo page below.
On this demo page, you can see how the above code works in practice.
Summary
Using JavaScript’s confirm method to check form submission is a great way to prevent unintended operations and improve website usability.
We hope this article helps you implement better web forms.
*Please use this at your own risk.
Do not reuse the Google Analytics tag inside the demo page head tag.