How to Implement a Fun Drawing Board with Mouse Using drawingboard.js
This time, I will introduce how to implement a drawing board that can be enjoyed in a browser. With this method, you can easily create a drawing tool that works on the browser. For example, this feature can be useful for educational sites for children or in providing interactive web content.
For beginner engineers, this is a very accessible subject to learn how to use JavaScript that runs in the browser. By actually working through this, you can understand the basic methods of building web applications.
In this tutorial, we will use a library called drawingboard.js. This library is a convenient tool that allows you to easily integrate a simple drawing app using Canvas into your website. Before moving on, I will explain how to introduce this library into your project and its basic settings.
- Introduction of drawingboard.js
- CSS Description for Implementing a Fun Drawing Board with Mouse in the Browser
- HTML Description for Displaying the Drawing Board
- JavaScript Description Using drawingboard.js
- drawingboard.js: Demo Page for Displaying the Drawing Board in the Browser
- Source: Drawingboard.js
- Conclusion
Introduction of drawingboard.js
First, you need to add drawingboard.js to your project. drawingboard.js can be easily downloaded from GitHub. Alternatively, you can also load it directly from the CDN. Include the library in your HTML file as shown below:
<script src="https://cdn.jsdelivr.net/npm/drawingboard.js"></script>
Now, you’re ready to use drawingboard.js. Let’s move on and look at the CSS and HTML description.
CSS Description for Implementing a Fun Drawing Board with Mouse in the Browser
To display the drawing board, appropriate CSS styling is necessary. Below is the basic style. By loading the drawingboard.css file, standard styles are applied, but you can also customize them as needed.
<link rel="stylesheet" href="css/drawingboard.css"> <style type="text/css" media="all"> <!-- body{ margin:0; padding:0; } h1{ text-align:center; font-size:18px; font-weight:bold; padding:10px 0; line-height:1.4em; text-align:center; } .board { margin: 0 auto; width: 300px; height: 300px; } #default-board { width: 700px; height: 400px; } --> </style>
In this CSS, the margin and padding of the body are reset to ensure that the entire page is properly laid out. The h1 tag centers the heading, and the board class sets the size and placement of the drawing board. The default-board specifies the default board size, but you can freely change this value according to your needs.
HTML Description for Displaying the Drawing Board
Next, let’s look at the HTML code. Here, we will prepare the area where the drawing board will be displayed. This area is where the user will actually draw with the mouse.
<h1>You can draw with the mouse.<br/> You can change colors, line width, eraser, etc. with the tools above the board.</h1>
In this code, the h1 tag displays a description, followed by a div tag that provides the area for the drawing board. This div tag is given the id=”default-board”, which serves as a marker for the JavaScript code to manipulate this area.
JavaScript Description Using drawingboard.js
Now, let’s write the JavaScript code to make the drawing board functional using drawingboard.js.
First, load the necessary JavaScript files: jquery-1.10.1.min.js, drawingboard.js, board.js, control.js, color.js, drawingmode.js, navigation.js, size.js, download.js, and utils.js. These scripts are used to load drawingboard.js and its related files. Each file handles different functionalities, such as color.js for changing colors, drawingmode.js for setting drawing modes, and download.js for providing the functionality to download the drawing.
Next, write the code to create and display the drawing board in the area with id=”default-board”. The DrawingBoard.Board (drawing board area) is set up. In this code, the DrawingBoard.Board class is used to create a drawing board in the area with the id “default-board”. With this simple description, a drawing board with basic functionality is displayed.
<script src="https://code.jquery.com/jquery-1.10.1.min.js"></script> <script src="js/drawingboard.js"></script> <script src="js/board.js"></script> <script src="js/controls/control.js"></script> <script src="js/controls/color.js"></script> <script src="js/controls/drawingmode.js"></script> <script src="js/controls/navigation.js"></script> <script src="js/controls/size.js"></script> <script src="js/controls/download.js"></script> <script src="js/utils.js"></script> <script data-example="1"> var defaultBoard = new DrawingBoard.Board('default-board'); </script>
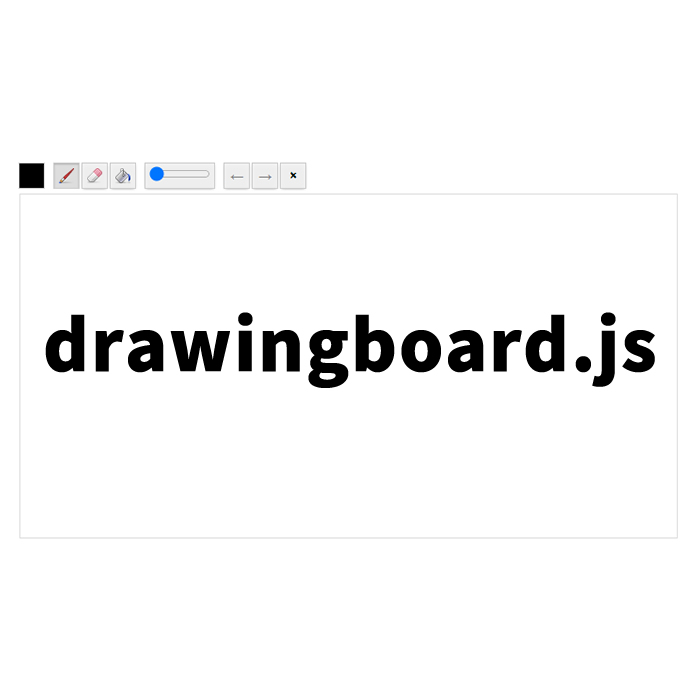
drawingboard.js: Demo Page for Displaying the Drawing Board in the Browser
You can check out a demo of the working drawing board from the link below. Refer to this demo and try applying it to your project.
drawingboard.js: Demo Page for Displaying the Drawing Board
Source: Drawingboard.js
For more detailed information and source code, please refer to the official drawingboard.js site. You can access it via the link below.
Source: Drawingboard.js: a simple canvas-based drawing app that you can integrate easily on your website.
Conclusion
By using drawingboard.js, you can easily implement a drawing board in your browser. In this tutorial, we explained everything from the basic introduction, CSS, and HTML descriptions to the JavaScript code and customization or additional functionalities.
By utilizing this method, you can easily create interactive web applications, making it a great starting point for beginner engineers. Please try incorporating drawingboard.js into your project and enjoy it.
Please use this at your own risk. Do not reuse the Google Analytics tag within the demo page tag.