How to Display High-Resolution Images in an Enlarged View: Implementing the Retina Effect Using jQuery
This time, we will explain in detail how to display high-resolution images in an enlarged view. Specifically, we will introduce how to use the “Retina Effect” with jQuery to magnify a portion of an image with a magnifying glass.
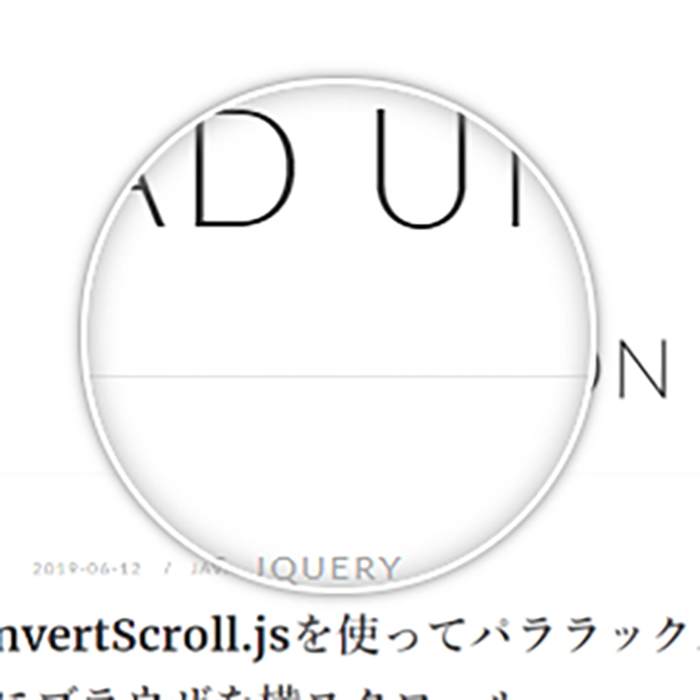
By preparing a high-resolution image and magnifying a part of it with a magnifying glass, you can clearly see even the details. This method is very effective when providing product images or detailed information. Let’s get started.
Preparation of Required Files
First, prepare the necessary files.
- High-resolution image (e.g., webpage.png)
- jQuery library
- Script file (e.g., script.js)
- Style sheet (e.g., style.css)
Add these files to your project.
CSS Description
This CSS code sets the style for the entire page and the magnifying glass effect.
<style type="text/css" media="all">
<!--
body{
	margin:0;
	padding:0;
}
h1{
	text-align:center;
	font-size:18px;
	font-weight:bold;
	padding:10px 0;
	line-height:1.4em;
	text-align:center;
}
.clWrap{
	width:750px;
	margin:0 auto;
}
#iphone{
	/* The iphone frame div */
	width:499px;
	height:283px;
	position:relative;
	margin:0 auto;
}
#webpage{
	/* Contains the webpage screenshot */
	width:499px;
	height:283px;
}
#retina{
	/* The Retina effect */
	background:url('img/webpage.png') no-repeat center center white;
	border:2px solid white;

	/* Positioned absolutely, so we can move it around */
	position:absolute;
	height:180px;
	width:180px;

	/* Hidden by default */
	display:none;

	/* A blank cursor, notice the default fallback */
	cursor:url('img/blank.cur'),default;

	/* CSS3 Box Shadow */
	-moz-box-shadow:0 0 5px #777, 0 0 10px #aaa inset;
	-webkit-box-shadow:0 0 5px #777;
	box-shadow:0 0 5px #777, 0 0 10px #aaa inset;

	/* CSS3 rounded corners */
	-moz-border-radius:90px;
	-webkit-border-radius:90px;
	border-radius:90px;
}
#retina.chrome{
	/* A special chrome version of the cursor */
	cursor:url('img/blank_google_chrome.cur'),default;
}
#main{
	/* The main div */
	margin:0 auto;
	position:relative;
	width:750px;
	padding-top:100px;
}
-->
</style>
JavaScript Description
Load the jquery.min.js (1.8.3) and script.js files.
<script src="https://ajax.googleapis.com/ajax/libs/jquery/1.8.3/jquery.min.js"></script>
<script type="text/javascript" src="script.js"></script>
The description of the script.js file is as follows. This JavaScript code implements the process for applying the magnifying glass effect when the mouse moves over the image.
The description of the mousemove, mouseleave, and mouseenter processes for the image area displayed in the magnifying glass.
$(document).ready(function(){

	/* This code is executed on the document ready event */

	var left	= 0,
		top		= 0,
		sizes	= { retina: { width:190, height:190 }, webpage:{ width:500, height:283 } },
		webpage	= $('#webpage'),
		offset	= { left: webpage.offset().left, top: webpage.offset().top },
		retina	= $('#retina');

	if(navigator.userAgent.indexOf('Chrome')!=-1)
	{
		/*	Applying a special chrome curosor,
			as it fails to render completely blank curosrs. */

		retina.addClass('chrome');
	}

	webpage.mousemove(function(e){

		left = (e.pageX-offset.left);
		top = (e.pageY-offset.top);

		if(retina.is(':not(:animated):hidden')){
			/* Fixes a bug where the retina div is not shown */
			webpage.trigger('mouseenter');
		}

		if(left<0 || top<0 || left > sizes.webpage.width || top > sizes.webpage.height)
		{
			/*	If we are out of the bondaries of the
				webpage screenshot, hide the retina div */

			if(!retina.is(':animated')){
				webpage.trigger('mouseleave');
			}
			return false;
		}

		/*	Moving the retina div with the mouse
			(and scrolling the background) */

		retina.css({
			left				: left - sizes.retina.width/2,
			top					: top - sizes.retina.height/2,
			backgroundPosition	: '-'+(1.6*left)+'px -'+(1.35*top)+'px'
		});

	}).mouseleave(function(){
		retina.stop(true,true).fadeOut('fast');
	}).mouseenter(function(){
		retina.stop(true,true).fadeIn('fast');
	});
});
HTML Description
Create an HTML file. Structure it as follows.
This HTML code places the structure for displaying the image and magnifying glass effect within the div element with the class clWrap.
<div class="clWrap">

	<h1>Magnify part of a high-resolution image with a magnifying glass.</h1>

    <div id="main">

        <div id="iphone">
            <div id="webpage">
                <img src="img/webpage.png" width="499" height="283" alt="BLINDER HIDDEN: Hidden Fine Play of Web Engineers"  title="BLINDER HIDDEN: Hidden Fine Play of Web Engineers" />
                <div id="retina"></div>
            </div>
        </div>

    </div><!--/main-->

</div><!--/clWrap-->
Demo Page Showing Part of an Image Magnified with a Magnifying Glass
You can check the demo page from here.
Demo of a Magnifying Glass Effect on a Portion of an Image
Source: Apple-like Retina Effect With jQuery | Tutorialzine
Source: Apple-like Retina Effect With jQuery | Tutorialzine
Conclusion
This concludes the explanation of how to display high-resolution images with a magnifying glass. By using this technique, you can provide users with detailed information and create a more interactive web experience.
This method is particularly effective when displaying product pages or detailed designs. Please consider incorporating it into your project.
※Please use this at your own risk if you decide to copy. Do not use the Google Analytics tag in the demo page tag.