Guide to Using a-table.js for Easy Table Creation and Editing
How to Use a-table.js
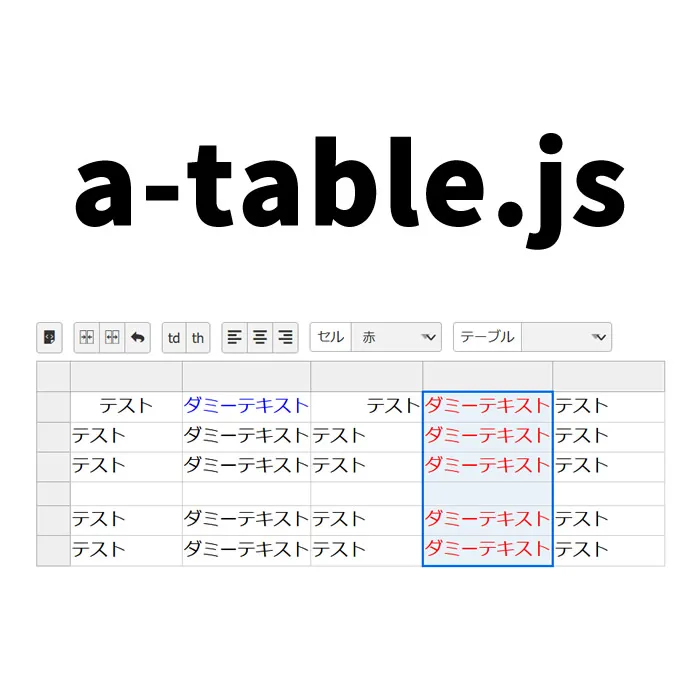
Have you ever struggled to create a table? Especially when creating a table from scratch with multiple rows and columns, it can be quite tedious. In this article, we will introduce a plugin called a-table.js, which can significantly reduce that hassle. Using this plugin, you can easily edit and generate table tags, saving you time and effort.
Basic Usage of a-table.js
First, load the necessary CSS files to use a-table.js:
<link rel='stylesheet' href="fonts/a-table-icon.css">
<link rel="stylesheet" href="a-table.css">
<style>
body {
    font-size: 16px;
}
h1{
    text-align: center;
    font-size: 20px;
    line-height: 1.6em;
    padding: 20px 0;
}
p{
  text-align: center;
}

/* table generation CSS */
* {
  -webkit-box-sizing: border-box;
  -moz-box-sizing: border-box;
  box-sizing: border-box;
}
.source-area {
  margin-top: 10px;
  padding: 5px;
  width: 100%;
  background-color: #cccccc;
  overflow-x: scroll;
}
.main {
  padding: 10px;
}
.column {
  padding: 5px;
  float: left;
  width: 50%;
}
.acms-admin-btn-group {
  display: table;
  float: left;
  padding: 7px 10px;
  padding-left: 0;
}
.acms-admin-btn-group .acms-admin-btn {
  border-radius: 0;
  display: table-cell;
  height: 28px;
  border-right: none;
}
.acms-admin-btn-group .acms-admin-btn:first-child {
  border-top-left-radius: 3px;
  border-bottom-left-radius: 3px;
}
.acms-admin-btn-group .acms-admin-btn:last-child {
  border-top-right-radius: 3px;
  border-bottom-right-radius: 3px;
  border-right: 1px solid #333333;
}
.a-table td.red {
  color: red;
}
.a-table td.blue {
  color: blue;
}
.a-table td.yellow {
  color: yellow;
}
</style>
HTML Example
Next, prepare the HTML code for the table tag that will be generated using a-table.js. We will create a default table (class=”table”) and specify the output areas for the generated table tag (class=”tbltag”) and markdown (class=”markdown”). Add the following code inside the body tag of your HTML:
<h1>Edit and Generate Table Tags Using a-table.js</h1>
<p>Try editing the following table.</p>

<div class="main acms-admin-form">
  <div class="acms-admin-table-container">
    <div class="acms-admin-table-wrap">
    <div class="acms-admin-table-inner">
    <table class="table">
      <tr>
        <td class="center">Test</td>
        <td class="blue">Dummy Text</td>
        <td class="right">Test</td>
        <td>Dummy Text</td>
        <td>Test</td>
      </tr>
      <tr>
        <td>Test</td>
        <td>Dummy Text</td>
        <td>Test</td>
        <td>Dummy Text</td>
        <td>Test</td>
      </tr>
      <tr>
        <td>Test</td>
        <td>Dummy Text</td>
        <td>Test</td>
        <td>Dummy Text</td>
        <td>Test</td>
      </tr>
      <tr>
        <td></td>
        <td></td>
        <td></td>
        <td></td>
        <td></td>
      </tr>
      <tr>
        <td>Test</td>
        <td>Dummy Text</td>
        <td>Test</td>
        <td>Dummy Text</td>
        <td>Test</td>
      </tr>
      <tr>
        <td>Test</td>
        <td>Dummy Text</td>
        <td>Test</td>
        <td>Dummy Text</td>
        <td>Test</td>
      </tr>
    </table>
    </div>
    </div>
  </div>
  <div class="column">
    <p>HTML</p>
    <div class="source-area">
      <div class="tbltag"></div>
    </div>
  </div>
  <div class="column">
    <p>Markdown</p>
    <div class="source-area">
      <div class="markdown"></div>
    </div>
  </div>
</div>
JavaScript Code
To use a-table.js, add the following JavaScript code. Load the a-table.js file and use new aTable('table selector', {options}). You can add custom options like cell color changes and formatting.
<script src="a-table.js"></script>
<script>
  var table = new aTable('.table',{
    lang:'en',
    mark:{
      icon: {
        td:false,
        th:false
      }
    },
    selector:{
      option:[
        {label:'Red',value:'red'},
        {label:'Blue',value:'blue'},
        {label:'Yellow',value:'yellow'}
      ]
    },
    tableOption: [
      {label:'Red',value:'red'},
      {label:'Blue',value:'blue'},
      {label:'Yellow',value:'yellow'}
    ]
  });
  table.afterRendered =
  table.afterEntered = function(){
    document.querySelector('.tbltag').innerText = this.getTable();
    document.querySelector('.markdown').innerText = this.getMarkdown();
  }
  table.afterRendered();
</script>
Demo Page for Editing and Generating Table Tags with a-table.js
We also have a working demo page available. Check it out by clicking the link below:
Demo Page for Editing and Generating Table Tags with a-table.js
Source: a-table.js
Conclusion
By using a-table.js, creating and editing complex table tags becomes much easier. We hope this article helps you get started, and we encourage you to try it out yourself. You’ll likely see a significant improvement in your workflow efficiency.
Note: Please use at your own risk if you decide to reuse the code. Do not reuse the Google Analytics tag in the head tag from the demo page.