Attract Attention with Effective Image Display! How to Create an Interactive Gallery Using jquery.flipping_gallery.js
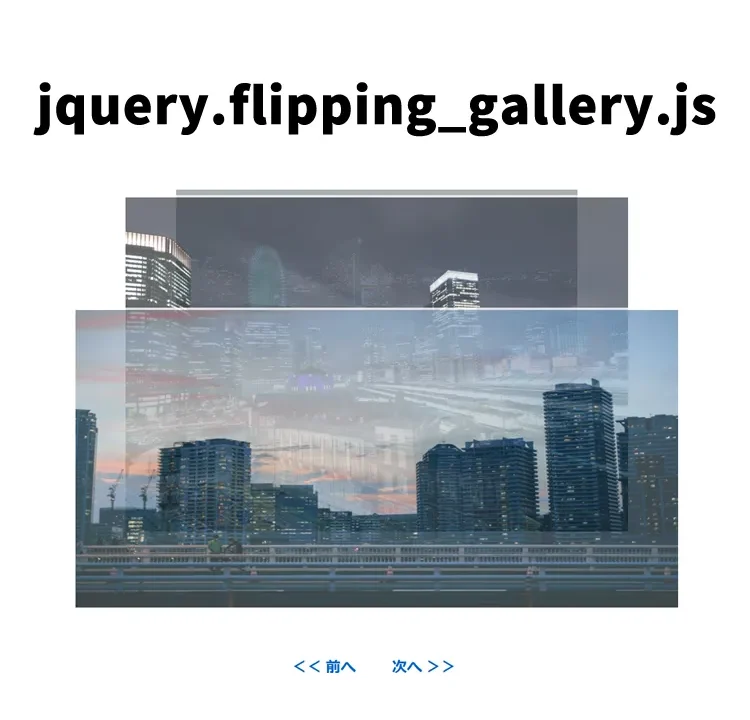
Here, I will introduce how to use “jquery.flipping_gallery.js” to create eye-catching gallery displays on your website or blog.
With this library, you can easily display multiple images by flipping them back and forth, providing visitors with a fresh visual experience.
Below, I will explain in an easy-to-understand way—from implementation methods to a demo page introduction—so even beginners can follow along.
Basic CSS Setup
First, let’s start with the basic CSS setup to beautifully display the gallery.
This setup forms the foundation for properly displaying the gallery.
Load the flipping_gallery.css file. The CSS below is for the gallery display area (.gallery).
Please refer to the following CSS code:
<style>
<link href="flipping_gallery.css" rel="stylesheet" type="text/css">
<style>
body {
  font-size: 16px;
  text-align: center;
}
h1{
  text-align: center;
  font-size: 18px;
  line-height: 1.6em;
  padding-top: 20px;
}
a{
  font-size: 20px;
  font-weight: bold;
  text-decoration: none;
}
p{
  line-height: 1.6em;
}
.gallery{
  width: 800px;
  height: 533px;
  margin: 0 auto;
}
.navigation{
  padding-top: 60px;
}
</style>
This code styles the gallery’s basic appearance and adjusts the position of the navigation buttons.
Feel free to change the design according to your project.
Preparing the HTML Structure
Next, let’s prepare the HTML structure to display the image gallery.
Refer to the code below and place the necessary images and navigation links.
In the gallery display area (class=”gallery”), prepare 3 images, a “<< Previous” link (class=”btn prev”), and a “Next >>” link (class=”btn next”).
<h1>Display multiple images back and forth using jquery.flipping_gallery.js</h1>
<p>You can switch images by clicking thumbnails, using a mouse trackball, or with the "<< Previous" and "Next >>" buttons.</p>
<br><br>

  <div class="gallery">
    <a href="#" data-caption="First image"><img src="1.jpg"></a>
    <a href="#" data-caption="Second image"><img src="2.jpg"></a>
    <a href="#" data-caption="Third image"><img src="3.jpg"></a>
  </div>

  <div class="navigation">
    <a href="#" class="btn prev"><< Previous</a>   <a href="#" class="btn next">Next >></a>
  </div>
Setting the Behavior with JavaScript
The flip behavior of the images is controlled with JavaScript.
Load the jquery.min.js and jquery.flipping_gallery.js files.
Write $(“gallery display area”).flipping_gallery({ options }).
In the options, you can set mouse scrolling for images and automatic switching.
Use $(“gallery display area”).flipForward() and $(“gallery display area”).flipBackward() to manually switch images forward and backward.
Use the script below to implement the image switching functionality:
  <script type="text/javascript" src="jquery.min.js"></script>
  <script type="text/javascript" src="jquery.flipping_gallery.js"></script>
  <script>
    $(document).ready( function() {
      $(".gallery").flipping_gallery({
        enableScroll: true,
        autoplay: 2000
      });

      $(".next").click(function() {
        $(".gallery").flipForward();
        return false;
      });
      $(".prev").click(function() {
        $(".gallery").flipBackward();
        return false;
      });
    });

  </script>
This code sets the gallery to automatically flip images every 2 seconds, as well as enables manual switching with the previous and next navigation buttons.
Demo Page: Display Multiple Images Back and Forth Using jquery.flipping_gallery.js
If you want to see it in action, please check the demo page below:
Demo page: Display multiple images back and forth using jquery.flipping_gallery.js
Source: flipping_gallery
You can get the full source code to implement this functionality from the link below:
flipping_gallery
Conclusion
By using “jquery.flipping_gallery.js”, you can easily create interactive gallery displays with movement.
Refer to this article and try implementing it on your own website or blog.
The visual appeal of utilizing images can attract visitors’ attention and is expected to increase the time they spend on your site.
*If you reuse this, please do so at your own risk.
Please do not reuse the Google Analytics tag in the demo page’s head tag.
