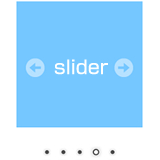
Multiple Image Transitions with Various Effects [jquery.nivo.slider.js]

Have you ever wanted to display images on your website as a slideshow? Adding multiple images with transitions and effects can significantly enhance the visual appeal. In this article, we’ll dive into how to use the plugin “jquery.nivo.slider.js” to seamlessly switch between multiple images with different effects. Even beginner engineers can follow this guide step-by-step to implement it easily.
“jquery.nivo.slider.js” is one of the jQuery-based slideshow plugins that allows you to add beautiful effects with ease. If you have a basic knowledge of HTML and CSS, you can quickly integrate it into your website. Let’s explore how it works.
What is jquery.nivo.slider.js?
“jquery.nivo.slider.js” is a popular jQuery slider plugin known for its ability to switch images with various effects. It allows you to create visually appealing web pages effortlessly. This plugin is characterized by its simple code structure and the availability of many pre-built effects. Another advantage is its lightweight nature, ensuring it won’t slow down your webpage’s loading speed.
Using this plugin, you can easily create slideshows with effects like fade-in, fade-out, slide, and wipe. Additionally, it’s responsive, meaning it works well on smartphones and tablets. If you’re looking to enhance your webpage with a slideshow, “jquery.nivo.slider.js” is an excellent choice.
Next, we’ll go through the setup process using sample code. Let’s start by configuring the CSS necessary for the slideshow.
CSS Code for Switching Multiple Images with Different Effects
To create a slideshow with “jquery.nivo.slider.js,” you need to apply the default stylesheets (CSS). These stylesheets control the appearance of the slide area and the behavior of the effects. Specifically, you’ll need to include two files: “default.css” and “nivo-slider.css”.
Here’s the CSS to define the slide area. In this example, we assign the class “slider-wrapper” to the slide area, but feel free to customize it as needed. Let’s look at the code.
<link rel="stylesheet" href="default/default.css" type="text/css" media="screen" />
<link rel="stylesheet" href="nivo-slider.css" type="text/css" media="screen" />
<style type="text/css">
<!--
body {
	font-family: Verdana, "Hiragino Kaku Gothic Pro", Osaka, Arial, sans-serif;
	margin: 0;
	padding: 0;
}
h1 {
	font-size: 16px;
	font-weight: normal;
	line-height: 1.4em;
	text-align: center;
	padding: 15px 0 5px 0;
}
p {
	font-size: 14px;
	text-align: center;
}
#idWrap {
	width: 650px;
	margin: 0 auto;
}
.slider-wrapper {
	width: 200px;
	margin: 0 auto;
}
-->
</style>
In this stylesheet, we set the slide area size, center alignment, and font properties. Adjust the width: 200px; of the “.slider-wrapper” class according to your design.
The “#idWrap” element wraps the entire slideshow. The margin: 0 auto; centers the slideshow, making it ideal for displaying in the middle of the page.
HTML Code for Switching Multiple Images with Various Effects
Next, let’s define the structure of the slideshow using HTML. In this example, the class “slider-wrapper” is assigned to the slide area, with an ID of “slider”. We’ve prepared five images, each with a thumbnail.
<div id="idWrap">
	<h1>Switch Multiple Images with Various Effects</h1>

	<div class="slider-wrapper theme-default">
		<div id="slider" class="nivoSlider">
			<img src="i01.jpg" data-thumb="i01.jpg" alt="First Image" title="First Image" />
			<img src="i02.jpg" data-thumb="i02.jpg" alt="Second Image" />
			<img src="i03.jpg" data-thumb="i03.jpg" alt="Third Image" title="Third Image" />
			<img src="i04.jpg" data-thumb="i04.jpg" alt="Fourth Image" />
			<img src="i05.jpg" data-thumb="i05.jpg" alt="Fifth Image" title="Fifth Image" />
		</div>
	</div>
</div>
The `<div id=”slider” class=”nivoSlider”>` contains the images for the slideshow. The `src` attribute specifies the image path, and `data-thumb` sets the thumbnail. The `alt` attribute provides alternative text, and the `title` attribute shows the image title on hover.
JavaScript Code for Switching Images with jquery.nivo.slider.js
Finally, let’s write the JavaScript to display the slideshow. First, include jQuery and the “jquery.nivo.slider.js” file.
<script type="text/javascript" src="jquery-1.9.0.min.js"></script>
<script type="text/javascript" src="jquery.nivo.slider.js"></script>
<script type="text/javascript">
$(window).load(function() {
	$('#slider').nivoSlider();
});
</script>
This code uses `$(window).load(function() { … });` to start the slideshow when the page loads. The `$(‘#slider’).nivoSlider();` switches the images defined in `<div id=”slider”>`.
You can customize the effects, speed, and pause time. For example, `$(‘#slider’).nivoSlider({ effect: ‘fade’, animSpeed: 500, pauseTime: 3000 });` creates a fade effect with a 500ms animation speed and a 3-second display time. Refer to the official documentation for more customization options.
Create a Demo Page with jquery.nivo.slider.js
That’s it! Now you know how to implement a slideshow using jquery.nivo.slider.js. Check out the working demo below.
Conclusion
“jquery.nivo.slider.js” is a great plugin for beginners to implement a slideshow effortlessly. With multiple effects and smooth transitions, it can add flair to your website design. Use this guide to try it out on your site!
※ Please use this content at your own risk. Do not reuse the Google Analytics tags from the demo page’s head tag.


