【Laravel】How to Style (Format) Cells in Exported Excel Files
Laravel is one of the most popular PHP frameworks, providing many useful tools for web developers. In particular, when you need to create and manage Excel files, the maatwebsite/excel package is extremely helpful.
In a previous article, “Laravel: Installing maatwebsite/excel and Exporting Excel Files,” we introduced how to easily export Excel files.
In this follow-up, we’ll explain how to apply styling (formatting and size settings) to the cells of exported Excel files. The steps are explained in detail so you can easily understand them in the context of Laravel.
What You’ll Learn in This Article
- How to style Excel cells (font size, borders, cell merging, etc.)
- How to set the width and height of Excel rows and columns
- How to write styling code in Laravel Blade templates
Prerequisites
This article assumes the following conditions are met:
- Laravel 6 is already installed
- The
maatwebsite/excelpackage is already integrated into your project - A
userstable is available as the data to be exported to Excel - You have prepared basic Excel export functionality by following the previous article, “How to Install maatwebsite/excel in Laravel and Export Excel Files”
Setting the View (Blade File) for the Excel Export
In this example, we’ll export “name” and “email” data from the users table to Excel, applying specific styles to the Excel cells. Below are examples before and after applying styling.
View Code Before Styling
First, let’s check the Blade file content before applying any styling.
The code for the view before styling the Excel cells (/resources/views/exports/excelusers.blade.php) is as follows:
<p>users table</p>
<table>
  <thead>
  <tr>
      <th>Name</th>
      <th>Email</th>
  </tr>
  </thead>
  <tbody>
  @foreach($users as $user)
      <tr>
          <td>{{ $user->name }}</td>
          <td>{{ $user->email }}</td>
      </tr>
  @endforeach
  </tbody>
</table>
This code simply exports the users table data to Excel without any styling.
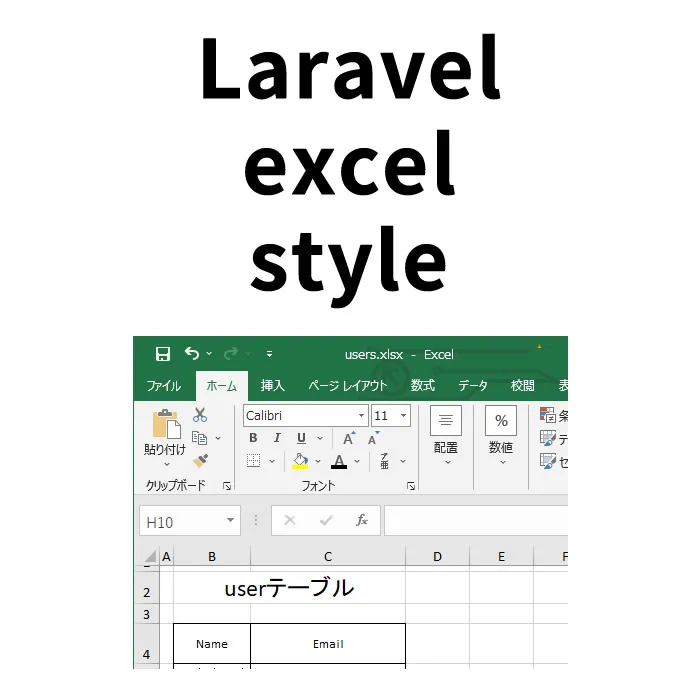
Excel Output Image Before Styling
View Code After Styling
Next, here’s the Blade file code after applying cell styling. This includes font size, borders, cell merging, and more.
The code for the view after styling the Excel cells (/resources/views/exports/excelusers.blade.php) is as follows:
<?php
$margin_th1 = "<th width='2'></th>";	// Left margin (Column A) in Excel
$margin_td1 = "<td></td>";	// Left margin (Column A) in Excel
$style1='style="font-size:9px; border:1px solid #000000; text-align:center; vertical-align: middle;"';	// Cell style (formatting)
?>

<table>
<thead>
    <tr>
        <?php echo $margin_th1; ?>
        <th height="5"></th>
    </tr>
</thead>
<tbody>
    <tr>
        <?php echo $margin_td1; ?>
        <td colspan="2" height="24" style="font-size:18px; text-align:center;">users table</td>
    </tr>
</tbody>
</table>

<table>
<thead>
    <tr>
	<?php echo $margin_th1; ?>
	<th width="11" height="30" <?php echo $style1; ?>>Name</th>
	<th width="22" <?php echo $style1; ?>>Email</th>
    </tr>
</thead>
<tbody>
    <tr>
	<?php echo $margin_td1; ?>
	<td <?php echo $style1; ?>>{{ $user->name }}</td>
	<td <?php echo $style1; ?>>{{ $user->email }}</td>
    </tr>
</tbody>
</table>
The above code specifies styles for each cell in detail, improving the visual appearance of the Excel file.
- To set cell formatting (font size, border, center alignment), use the
styleattribute. - To set the cell height or width, specify
widthorheightin thetdorthtags. - To add a margin to the top or left of the table, add empty
tdorthtags. - To merge cells vertically or horizontally, use
colspanorrowspan.
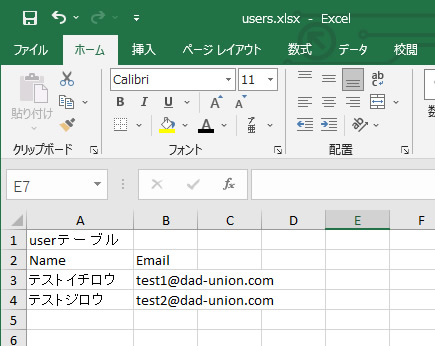
Excel Output Result
Below is an example image of the Excel output after styling.
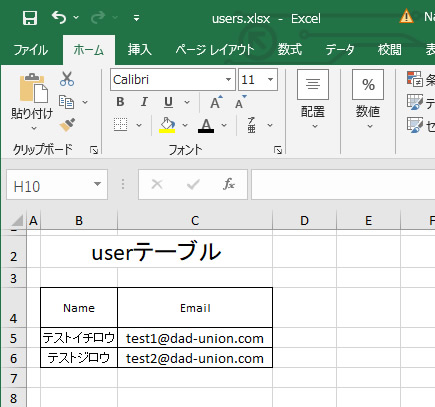
The Excel file is output with cell formatting (font size, border, and center alignment) applied.
Conclusion
In this article, we introduced how to style Excel cells using Laravel.
With just a simple code modification, you can greatly improve the appearance of your Excel files.
Be sure to try out the methods introduced here in your own projects!
We will continue to post articles about Laravel and Excel manipulation, so be sure to bookmark us!
※ If you reuse this content, please do so at your own risk.