カーソル位置のテーブル(表)列の背景色をハイライトする方法
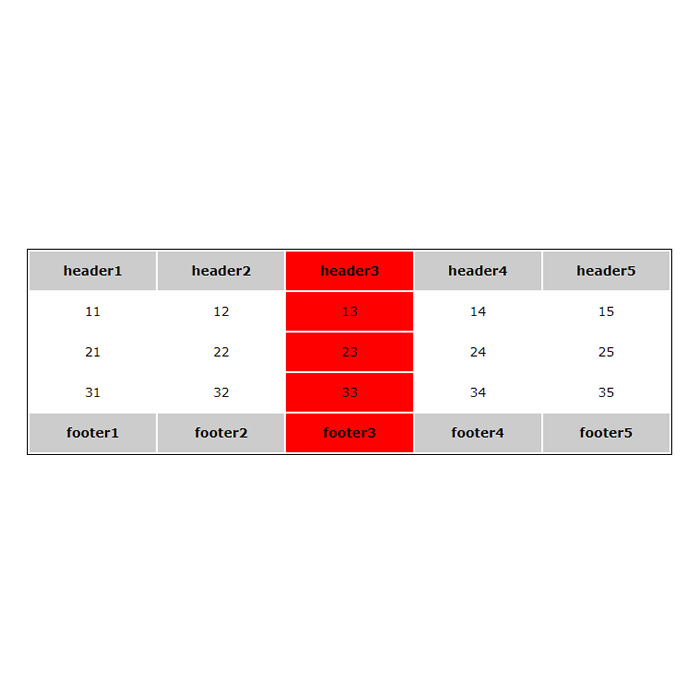
今回は、ウェブサイトのユーザーエクスペリエンス向上に役立つテクニックとして、テーブル(表)内の列にカーソルを持っていくと、その列が赤くハイライトされる方法について解説します。こうした視覚効果は、特にデータを多く含む表の可読性を高め、閲覧者にとって情報を簡単に追跡しやすくする効果があります。
このガイドでは、HTML、CSS、JavaScriptを用いて、簡単にテーブルの列をハイライトする方法を説明します。初心者にもわかりやすいよう、手順ごとに丁寧に解説していきます。
テーブル列をハイライトするためのCSS記述
まず、テーブル全体のデザインと構造をCSSで整えます。以下は、テーブル#tbl1を使ったスタイルシートの一例です。このCSSは、テーブルを中央に配置し、各要素のデフォルトスタイルを設定しています。
<style type="text/css">
body{
  font-family:Verdana,"Hiragino Kaku Gothic Pro","ヒラギノ角ゴ Pro W6",Osaka,"MS Pゴシック",Arial,sans-serif;
  padding: 0;
  margin: 0;
  overflow-x: hidden;
  line-height: 1.8em;
  text-align: center;
}
h1{
  font-size:16px;
  text-align:center;
  font-weight:normal;
  padding:10px 0;
  position: relative;
}
#tbl1{
  width: 700px;
  margin: 0 auto;
}
#tbl1 tr,
#tbl1 th,
#tbl1 td {
    background-color: inherit;
    font-size: 14px;
    height: 40px;
}
#tbl1 thead,
#tbl1 tfoot {
    background-color: #cccccc;
}
#tbl1 {
    border: solid 1px #000000;
}
</style>
テーブル列をハイライトするためのHTML記述
次に、ハイライトされるテーブル(id=”tbl1″)自体のHTML構造を説明します。colgroup タグを活用して、列のグループを設定し、JavaScriptから制御しやすくします。
<h1>テーブル(表)の列にカーソルをもっていくとカーソル位置の列が赤くハイライトします。</h1>

<table id="tbl1">
    <colgroup span="1"></colgroup>
    <colgroup span="1"></colgroup>
    <colgroup span="1"></colgroup>
    <colgroup span="1"></colgroup>
    <colgroup span="1"></colgroup>
    <thead>
        <tr>
            <th>header1</th>
            <th>header2</th>
            <th>header3</th>
            <th>header4</th>
            <th>header5</th>
        </tr>
    </thead>
    <tbody>
        <tr>
            <td>11</td>
            <td>12</td>
            <td>13</td>
            <td>14</td>
            <td>15</td>
        </tr>
        <tr>
            <td>21</td>
            <td>22</td>
            <td>23</td>
            <td>24</td>
            <td>25</td>
        </tr>
        <tr>
            <td>31</td>
            <td>32</td>
            <td>33</td>
            <td>34</td>
            <td>35</td>
        </tr>
    </tbody>
    <tfoot>
        <tr>
            <th>footer1</th>
            <th>footer2</th>
            <th>footer3</th>
            <th>footer4</th>
            <th>footer5</th>
        </tr>
    </tfoot>
</table>
このようにHTMLを構築することで、行や列の操作が簡単になります。colgroup タグは列全体を指定できるため、列単位で背景色を変えるときに役立ちます。
JavaScriptによる列のハイライト
最後に、テーブル(id=”tbl”)の列をハイライトするためのJavaScriptを紹介します。カーソルがセル上に移動(onmouseover)した際に、その列全体の背景色を赤に変更し、カーソルが離れる(onmouseout)と背景色を元に戻します。
<script type="text/javascript">
window.onload = function(){
    var $tbl1Table = document.getElementById( "tbl1" );
    var $tbl1Colgroup = $tbl1Table.getElementsByTagName( "colgroup" );
    var $tbl1THeadCells = $tbl1Table.tHead.rows[0].cells;
    var $tbl1TFootCells = $tbl1Table.tFoot.rows[0].cells;
    var $tbl1Rows = $tbl1Table.rows;
    for ( var $rowidx = 0; $rowidx < $tbl1Rows.length; $rowidx++ ) {
        var $tbl1Cells = $tbl1Rows[$rowidx].cells;
        for ( var $cellIndex = 0; $cellIndex < $tbl1Cells.length; $cellIndex++ ) {
            $tbl1Cells[$cellIndex].onmouseover = function(){
                changebkc( $tbl1Colgroup[this.cellIndex], "red" );
                changebkc( $tbl1THeadCells[this.cellIndex], "red" );
                changebkc( $tbl1TFootCells[this.cellIndex], "red" );
            };
            $tbl1Cells[$cellIndex].onmouseout = function(){
                changebkc( $tbl1Colgroup[this.cellIndex], "" );
                changebkc( $tbl1THeadCells[this.cellIndex], "" );
                changebkc( $tbl1TFootCells[this.cellIndex], "" );
            };
        }
    }
}

function changebkc( $elementReference, $color ){
    $elementReference.style.backgroundColor = $color;
}
</script>
このスクリプトは、ページ読み込み時にテーブル#tbl1内のすべてのセルを走査し、セルごとにonmouseoverとonmouseoutイベントを設定します。これにより、カーソルがセルに乗った際に、そのセルが属する列の背景色が赤く変わります。
changebkc関数は、渡された要素の背景色を指定された色に変更するシンプルなものです。
カーソル位置のテーブル(表)列の背景を赤くハイライトするデモページ
実際にこの機能がどのように動作するのかを確認するために、以下のデモページで動作を確かめてみてください。具体的な操作方法を通して、理解を深めることができるでしょう。
カーソル位置のテーブル(表)列の背景を赤くハイライトするデモページ
まとめ
今回の解説で、CSS、HTML、JavaScriptを組み合わせてテーブル列のハイライトを実現する方法を紹介しました。この技術は、データを視覚的に区分けして見やすくするために非常に有用です。さらに、視覚的なフィードバックを追加することで、ユーザーはデータを効率的に閲覧できます。
ぜひこのテクニックを応用して、ユーザーフレンドリーなウェブコンテンツを作成してみてください。
※流用される場合は自己責任でお願いします。
デモページheadタグ内のGoogleアナリティクスタグは流用しないで下さい。
PCトラブルは解決しましたか?
もし「会社のPCが全部遅い」「Office 365のエラーが多発する」「ネットワークが不安定」といった、調べても解決しない「会社全体」のお悩みがありましたら、ぜひご相談ください。
「Windows11 高速化」といったお悩み検索で毎月1,200人以上が訪れる、
このサイトの運営者(建設会社IT部長)が、川崎・横浜・東京城南エリアの法人様限定で「無料ITお困りごと診断」を行っています。
