簡単カスタマイズ!jquery.nice-select.jsで美しいselectタグ表示の作り方
Web開発の現場で頻繁に直面する問題の一つが、HTMLのselectタグの見た目のカスタマイズです。標準のselectタグはスタイリングが限られており、デザインの自由度が低いため、プロジェクトによってはユーザーインターフェースの質を落としてしまうことも。しかし、jquery.nice-select.jsを使えば、この問題を簡単に解決できます!
今回はjquery.nice-select.jsを使ってselectタグ要素をカスタイマイズ表示する方法をご紹介します。
なぜjquery.nice-select.jsなのか?
jquery.nice-select.jsは、シンプルで使いやすいjQueryプラグインです。このプラグインを使えば、標準のselectタグを、美しく、使いやすいドロップダウンメニューに変換できます。カスタマイズの幅も広く、デザインのバリエーションを豊かにすることができるため、Webデザイナーやフロントエンド開発者には必見のツールです。
カスタマイズの手順
CSSの設定
まずは、必要なCSSファイルnice-select.cssを読み込みます。以下のコードをあなたのプロジェクトに追加してください。ここでは.selareaクラスを用いて、カスタマイズするselectタグを囲んでいます。このクラス名はプロジェクトに合わせて変更可能です。
<link rel="stylesheet" href="./nice-select.css">
<style>
body {
  margin: 20px 10px;
  padding: 0;
  font-size: 18px;
  text-align: center;
}
h1{
  text-align: center;
  font-size: 22px;
  line-height: 2em;
  padding-bottom: 20px;
}
.selarea{
  width: 200px;
  margin: 0 auto;
}
</style>
HTMLの構築
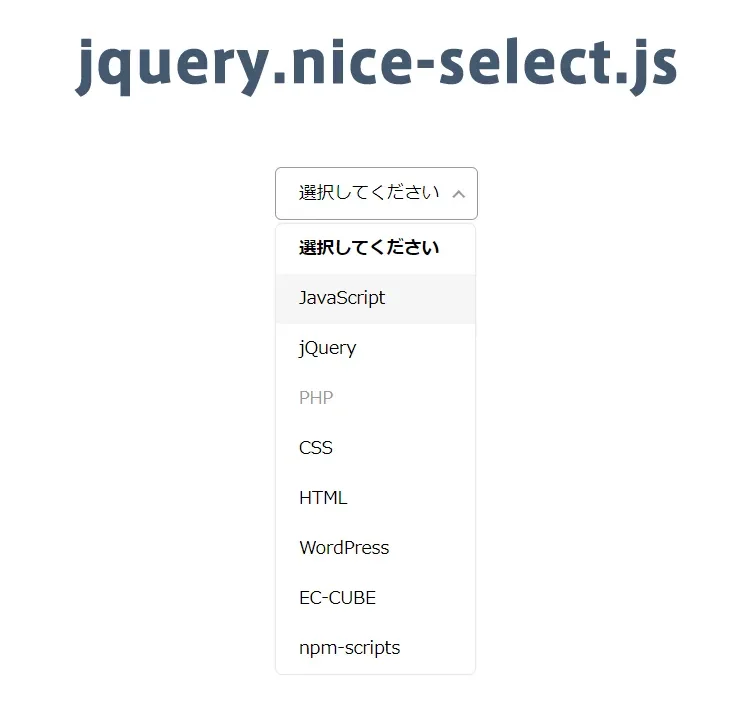
次に、HTMLの構造を設定します。以下のようにselectタグを配置し、複数のoptionタグを用意します。オプションの内容はプロジェクトに応じて調整してください。
<h1>jquery.nice-select.jsを使ってselectタグ要素をカスタイマイズ表示</h1>

<div class="selarea">
<select>
  <option data-display="選択してください">選択してください</option>
  <option value="JavaScript">JavaScript</option>
  <option value="jQuery">jQuery</option>
  <option value="PHP" disabled>PHP</option>
  <option value="CSS">CSS</option>
  <option value="HTML">HTML</option>
  <option value="WordPress">WordPress</option>
  <option value="EC-CUBE">EC-CUBE</option>
  <option value="npm-scripts">npm-scripts</option>
</select>
</div>
jquery.nice-select.jsを使ってJavaScriptで活用
最後に、jquery.nice-select.jsを活用するためのJavaScriptを記述します。以下のコードをあなたのプロジェクトに追加してください。
jquery-2.1.4.min.js、jquery.nice-select.jsファイルを読み込みます。$(‘selectタグ要素’).niceSelect()を記述します。
<script src="jquery-2.1.4.min.js"></script>
<script src="jquery.nice-select.js"></script>
<script>
$(document).ready(function() {
  $('select').niceSelect();
});
</script>
jquery.nice-select.jsを使ってselectタグ要素をカスタイマイズ表示するデモページ
実際の動作例を以下のデモページで確認できます。このデモを見ることで、jquery.nice-select.jsの魅力をより深く理解できるはずです。
jquery.nice-select.jsを使ってselectタグ要素をカスタイマイズ表示するデモページ
ソース元:jQuery Nice Select
jquery.nice-select.jsに関する更なる情報は、以下の公式サイトをご覧ください。
まとめ
selectタグのカスタマイズは、Web開発の中で重要な要素の一つです。jquery.nice-select.jsを使えば、このタスクを効率的かつ魅力的に解決できます。本記事で紹介した手順を試して、あなたのWebサイトやアプリケーションのユーザーインターフェースを一層洗練させましょう!
※流用される場合は自己責任でお願いします。
デモページheadタグ内のGoogleアナリティクスタグは流用しないで下さい。
PCトラブルは解決しましたか?
もし「会社のPCが全部遅い」「Office 365のエラーが多発する」「ネットワークが不安定」といった、調べても解決しない「会社全体」のお悩みがありましたら、ぜひご相談ください。
「Windows11 高速化」といったお悩み検索で毎月1,200人以上が訪れる、
このサイトの運営者(建設会社IT部長)が、川崎・横浜・東京城南エリアの法人様限定で「無料ITお困りごと診断」を行っています。