How to Customize the WordPress Password-Protected Screen
WordPress allows you to protect specific posts with a password. In this article, we will introduce how to customize the password-protected screen.
Even beginners can easily implement this by following a step-by-step explanation.
Location of the File to Edit: “functions.php”
First, let’s check the location of the file you need to edit for customization. Edit the functions.php file located at the following path.
WordPress theme folder
/wp-content/themes/theme-folder/functions.php
Edit this file.
Hide the “Protected” Text
Hide the “Protected” text that appears in the title of password-protected posts.
Add the following code to the bottom of the functions.php file.
add_filter( 'mwform_validation_mw-wp-form-133', 'my_validation_rule', 10, 3 );

add_filter('protected_title_format', 'remove_protected');
function remove_protected($title) {
       return '%s';
}
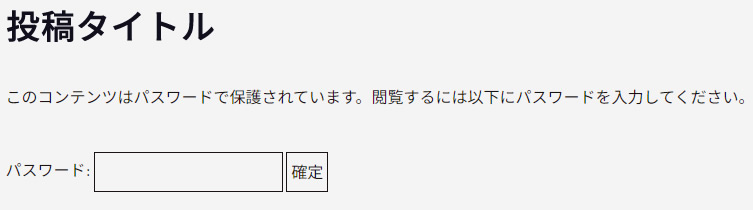
By adding this code, the “Protected” text will be hidden. It will be displayed as shown in the image below.
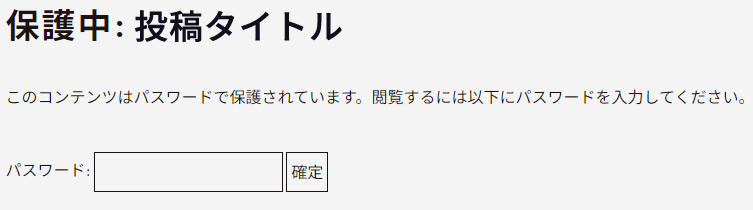
Customize the Text and Form on the Password-Protected Screen
Next, customize the text and form on the password-protected screen.
Add the following code to the bottom of the functions.php file.
function my_password_form() {
return
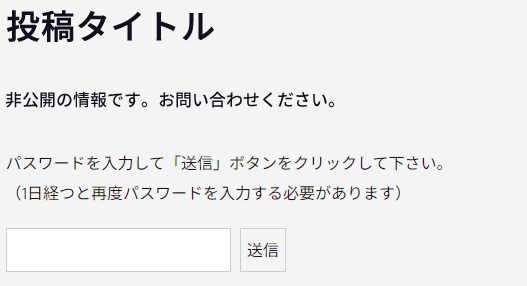
'<p style="padding:40px 0 0 0;">This content is private. Please contact us.</p><p style="padding:35px 0 20px 0;">Enter the password and click the “Submit” button.<br>(You will need to re-enter the password after one day.)<p>
<form class="post_password" action="' . home_url() . '/wp-login.php?action=postpass" method="post">
<input name="post_password" type="password" size="24" style="border:solid 1px #cccccc; padding:6px; background-color:#ffffff;" />
<input type="submit" name="Submit" value="' . esc_attr__("Submit") . '" style="border:solid 1px #cccccc; padding:6px; margin:0 0 0 6px;" />
</form>';
}
add_filter('the_password_form', 'my_password_form');
After adding this code, the password-protected screen will be customized as shown below.
Change the Viewing Period (Cookie) After Entering the Password
By default, the viewing period after entering the password on a password-protected screen is set to 10 days. This section explains how to change it to 1 day.
Add the following code to the bottom of the functions.php file.
function custom_postpass_time() {
    require_once ABSPATH . 'wp-includes/class-phpass.php';
    $hasher = new PasswordHash( 8, true );
    setcookie( 'wp-postpass_' . COOKIEHASH, $hasher->HashPassword( wp_unslash( $_POST['post_password'] ) ), time() + DAY_IN_SECONDS, COOKIEPATH );
    wp_safe_redirect( wp_get_referer() );
    exit();
}
add_action( 'login_form_postpass', 'custom_postpass_time' );
In the code above, the viewing period is set to one day using DAY_IN_SECONDS. You can change the viewing period (cookie) here.
If you want to set it to one hour, use HOUR_IN_SECONDS.
Summary
In this blog post, we explained how to customize password-protected posts in WordPress.
By following the steps below, you can customize the password-protected screen to suit your needs.
- Edit the functions.php file to hide the “Protected” text.
- Customize the text and form on the password-protected screen.
- Change the viewing period after entering the password.
By applying these customizations, you can provide a more user-friendly password-protection feature for your visitors. Give it a try.
*Please use this code at your own risk if you choose to reuse it.*