4 ways to change for each page in Laravel
Laravel is a very flexible and powerful PHP framework that makes web application development efficient and easy. With this framework, you can use views and controllers to set different titlpage titleses for each page. Below, we introduce four specific methods to achieve this.
Passing Data from Controller to View
Basic Structure
First, it is essential to understand how Laravel works based on the MVC (Model-View-Controller) architecture. The controller is responsible for data processing, while the view controls the user interface. Let’s take a look at the general steps for dynamically changing a page title.
Creating and Configuring a Controller
When creating a controller, use the following command.
php artisan make:controller PageController
Next, define the data to be passed to each page within the PageController. Here, we explore how to dynamically set the title.
For example,
public function home()
{
    $title = 'Home Page';
    return view('home', compact('title'));
}

public function about()
{
    $title = 'About Us';
    return view('about', compact('title'));
}
In the methods above, a unique title is passed to each page (home and about) as the $title variable.
Defining Routes
Next, define routes to each method in routes/web.php.
use App\Http\Controllers\PageController;

Route::get('/home', [PageController::class, 'home']);
Route::get('/about', [PageController::class, 'about']);
Here, a specific method within the controller is assigned to each URL.
Creating Views
Next, create the views. Create home.blade.php and about.blade.php in the resources/views directory and define the HTML for each page. To display the title dynamically, do the following.
<!-- resources/views/home.blade.php -->
<html>
<head>
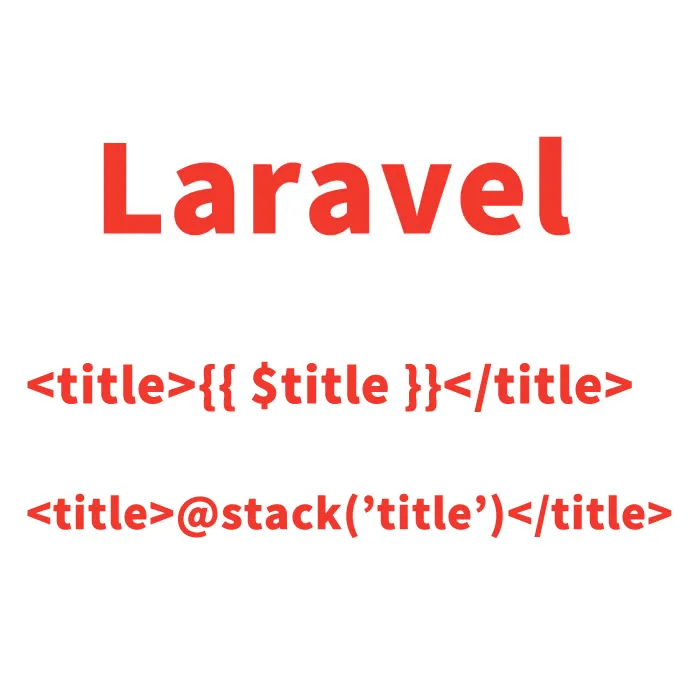
<title>{{ $title }}</title>
</head>
<body>
<!-- Page content -->
</body>
</html>
The {{ $title }} syntax is used by the Blade template engine to escape and output variables. This allows the $title variable passed from the controller to be displayed as the page title.
Extending Pages and Using Layouts
For a more efficient design, you can use a layout view to create a structure that dynamically loads page-specific content. This allows you to centrally manage common elements such as headers and footers, while defining only the content in each page view.
<!-- resources/views/layouts/app.blade.php -->
<html>
<head>
    <title>{{ $title }}</title>
</head>
<body>
    <div class="content">
        @yield('content')
    </div>
    <!-- More layout... -->
</body>
</html>
In each content page, extend this layout and override the content section.
<!-- resources/views/home.blade.php -->
@extends('layouts.app')

@section('content')
    <!-- Home page content -->
@endsection
Metadata such as page titles can be passed in various ways, but the basic idea is generally to pass data from the controller to the view and display it there. The explanation above covers a simple yet fundamental approach, and it can be extended and customized in many ways.
Based on this knowledge, you can apply Laravel to various situations, such as more advanced use cases, passing other data to views, or using view composers and view service providers for global data sharing techniques.
In addition, there are several methods to change the title for each page using only views. The following describes those approaches.
Setting Conditional Titles in a Single View
If the number of routes is small and the only difference between pages is the title, you can check the URL within the view and set the title accordingly.
Below is a basic example of changing the page title based on the current URL within a Blade template.
<!-- resources/views/app.blade.php -->
<html>
<head>
    <title>
        @switch(request()->path())
            @case('home')
                Home Page
                @break
            @case('about')
                About Us
                @break
            @default
                My Website
        @endswitch
    </title>
</head>
<body>
    <!-- ... body contents ... -->
</body>
</html>
In this code, request()->path() is used to retrieve the current URL path, and the @switch directive outputs a different title based on that path.
Using Partial Views and Variables
Another approach is to separate the head tag (including the title tag) into a separate view file and define different titles in each view.
First, separate the head section and save it as a partial view.
<!-- resources/views/partials/head.blade.php -->
<head>
    <title>{{ $title ?? 'Default Title' }}</title>
    <!-- other head elements... -->
</head>
Then, define the title in each page view and include the head partial.
<!-- resources/views/home.blade.php -->
@php
    $title = 'Home Page';
@endphp

@include('partials.head')
<body>
    <!-- Home Page Content -->
</body>
</html>
<!-- resources/views/about.blade.php -->
@php
    $title = 'About Us';
@endphp

@include('partials.head')
<body>
    <!-- About Page Content -->
</body>
</html>
Here, each view (home.blade.php and about.blade.php) defines the title as a PHP variable $title, which is then output in head.blade.php. If the title is not defined, a default title is displayed.
Using Stacks
Laravel’s Blade template engine allows you to add sections to a parent view using stacks. This feature can also be used to dynamically change the title.
<!-- resources/views/layouts/app.blade.php -->
<html>
<head>
    <title>@stack('title') | My Website</title>
</head>
<body>
    <div class="content">
        @yield('content')
    </div>
</body>
</html>
In each view, you can push a title onto this stack.
<!-- resources/views/home.blade.php -->
@extends('layouts.app')

@push('title')
    Home Page
@endpush

@section('content')
    <!-- Home Page Content -->
@endsection
Choose one of the methods above and use the approach that best suits your project’s needs. These techniques are not mutually exclusive, so depending on the situation and requirements, you may want to consider combining multiple approaches.
※If you reuse this content, please do so at your own responsibility.