高解像度画像を拡大表示する方法:jQueryを使ったRetina Effectの実装
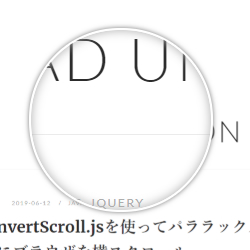
今回は、高解像度の画像を拡大表示する方法について詳しく解説します。特に、jQueryを使った「Retina Effect」を利用して、画像の一部を虫眼鏡で拡大表示する方法をご紹介します。
高解像度の画像を用意し、その一部を虫眼鏡で拡大表示することで、細部まで鮮明に確認できるようになります。この方法は、製品画像や詳細な情報を提供する際に非常に有効です。では、さっそく始めましょう。
必要なファイルの準備
まず、必要なファイルを準備します。
- 高解像度の画像(例: webpage.png)
- jQueryライブラリ
- スクリプトファイル(例: script.js)
- スタイルシート(例: style.css)
これらのファイルをプロジェクトに追加しておきましょう。
CSSの記述
このCSSコードでは、ページ全体のスタイルと、虫眼鏡効果のスタイルを設定しています。
<style type="text/css" media="all">
<!--
body{
	margin:0;
	padding:0;
}
h1{
	text-align:center;
	font-size:18px;
	font-weight:bold;
	padding:10px 0;
	line-height:1.4em;
	text-align:center;
}
.clWrap{
	width:750px;
	margin:0 auto;
}
#iphone{
	/* The iphone frame div */
	width:499px;
	height:283px;
	position:relative;
	margin:0 auto;
}
#webpage{
	/* Contains the webpage screenshot */
	width:499px;
	height:283px;
}
#retina{
	/* The Retina effect */
	background:url('img/webpage.png') no-repeat center center white;
	border:2px solid white;

	/* Positioned absolutely, so we can move it around */
	position:absolute;
	height:180px;
	width:180px;

	/* Hidden by default */
	display:none;

	/* A blank cursor, notice the default fallback */
	cursor:url('img/blank.cur'),default;

	/* CSS3 Box Shadow */
	-moz-box-shadow:0 0 5px #777, 0 0 10px #aaa inset;
	-webkit-box-shadow:0 0 5px #777;
	box-shadow:0 0 5px #777, 0 0 10px #aaa inset;

	/* CSS3 rounded corners */
	-moz-border-radius:90px;
	-webkit-border-radius:90px;
	border-radius:90px;
}
#retina.chrome{
	/* A special chrome version of the cursor */
	cursor:url('img/blank_google_chrome.cur'),default;
}
#main{
	/* The main div */
	margin:0 auto;
	position:relative;
	width:750px;
	padding-top:100px;
}
-->
</style>
JavaScriptの記述
jquery.min.js(1.8.3)、script.jsファイルを読み込みます。
<script src="https://ajax.googleapis.com/ajax/libs/jquery/1.8.3/jquery.min.js"></script>
<script type="text/javascript" src="script.js"></script>
script.jsファイルの記述は以下の通りです。このJavaScriptコードでは、画像の上にマウスを移動した際に、虫眼鏡効果を適用するための処理を実装しています。
虫眼鏡で拡大表示する画像エリアに対してmousemove、mouseleave、mouseenter処理の記述です。
$(document).ready(function(){

	/* This code is executed on the document ready event */

	var left	= 0,
		top		= 0,
		sizes	= { retina: { width:190, height:190 }, webpage:{ width:500, height:283 } },
		webpage	= $('#webpage'),
		offset	= { left: webpage.offset().left, top: webpage.offset().top },
		retina	= $('#retina');

	if(navigator.userAgent.indexOf('Chrome')!=-1)
	{
		/*	Applying a special chrome curosor,
			as it fails to render completely blank curosrs. */

		retina.addClass('chrome');
	}

	webpage.mousemove(function(e){

		left = (e.pageX-offset.left);
		top = (e.pageY-offset.top);

		if(retina.is(':not(:animated):hidden')){
			/* Fixes a bug where the retina div is not shown */
			webpage.trigger('mouseenter');
		}

		if(left<0 || top<0 || left > sizes.webpage.width || top > sizes.webpage.height)
		{
			/*	If we are out of the bondaries of the
				webpage screenshot, hide the retina div */

			if(!retina.is(':animated')){
				webpage.trigger('mouseleave');
			}
			return false;
		}

		/*	Moving the retina div with the mouse
			(and scrolling the background) */

		retina.css({
			left				: left - sizes.retina.width/2,
			top					: top - sizes.retina.height/2,
			backgroundPosition	: '-'+(1.6*left)+'px -'+(1.35*top)+'px'
		});

	}).mouseleave(function(){
		retina.stop(true,true).fadeOut('fast');
	}).mouseenter(function(){
		retina.stop(true,true).fadeIn('fast');
	});
});
HTMLの記述
HTMLファイルを作成します。以下のような構造にします。
このHTMLコードでは、clWrapというクラスを持つdiv要素の中に、画像と虫眼鏡効果を表示するための構造を配置しています。
<div class="clWrap">

	<h1>解像度の高い画像の一部を虫眼鏡で拡大して表示します。</h1>

    <div id="main">

        <div id="iphone">
            <div id="webpage">
                <img src="img/webpage.png" width="499" height="283" alt="BLINDER HIDDEN: WEBエンジニアの隠れたファインプレー"  title="BLINDER HIDDEN: WEBエンジニアの隠れたファインプレー" />
                <div id="retina"></div>
            </div>
        </div>

    </div><!--/main-->

</div><!--/clWrap-->
画像の一部を虫眼鏡で拡大した様に表示するデモページ
デモページはこちらから確認できます。
画像の一部を虫眼鏡で拡大した様に表示するデモ
ソース元:Apple-like Retina Effect With jQuery | Tutorialzine
ソース元:Apple-like Retina Effect With jQuery | Tutorialzine
まとめ
これで、高解像度の画像を虫眼鏡で拡大表示する方法の解説は終了です。この技術を使うことで、ユーザーに詳細な情報を提供し、よりインタラクティブなウェブ体験を実現することができます。
この方法は特に製品ページや詳細なデザインを表示する場合に非常に有効です。ぜひ、自分のプロジェクトに取り入れてみてください。
※流用される場合は自己責任でお願いします。
デモページタグ内のGoogleアナリティクスタグは流用しないで下さい。
PCトラブルは解決しましたか?
もし「会社のPCが全部遅い」「Office 365のエラーが多発する」「ネットワークが不安定」といった、調べても解決しない「会社全体」のお悩みがありましたら、ぜひご相談ください。
「Windows11 高速化」といったお悩み検索で毎月1,200人以上が訪れる、
このサイトの運営者(建設会社IT部長)が、川崎・横浜・東京城南エリアの法人様限定で「無料ITお困りごと診断」を行っています。
